Perfect Mini Pumpkin Pies: Your Holiday Stress-Free Dessert Solution
The holiday season, especially Thanksgiving, often brings with it the joy of delicious food and warm gatherings. Yet, for many home bakers, the thought of perfecting a traditional pie – with its intricate crust decorating and the pressure of a flawless presentation – can be a source of significant stress. What if we told you there was a way to enjoy all the rich, comforting flavors of pumpkin pie without any of the intimidation? Enter the delightful world of mini pumpkin pies!
These adorable, individual-sized treats are not just a charming addition to any dessert spread; they are the ultimate solution for stress-free holiday baking. Made effortlessly in a muffin pan, these bite-sized wonders eliminate the need for fancy crimping or decorative lattice work. With a filling that comes together in mere minutes and a simple baking process, you'll wonder why you ever bothered with full-sized pies. Get ready to embrace the joy of baking again and impress your guests with these irresistible, perfectly portioned pumpkin pies!
Why Mini Pumpkin Pies Are Your Holiday Stress-Relief Dessert
For many, the idea of baking a pie from scratch can feel overwhelming. The crust alone can be a challenge, let alone the pressure of making it look picture-perfect for a holiday table. This is precisely where mini pumpkin pies shine as a true game-changer. Their inherent design addresses common pie-making anxieties head-on:
- No Decorating Stress: The biggest draw of these mini marvels is that they are baked in a muffin pan. This means you simply press your crust circles into the cavities, add the filling, and bake. There's absolutely no need for complex fluting, crimping, or lattice tops. The edges are naturally formed by the muffin tin, making them consistently neat and presentable. This frees up precious time and energy during a busy holiday season.
- Effortless Portion Control: Serving a traditional pie can sometimes be messy, and guests might hesitate to take a full slice. Mini pumpkin pies, however, are individual portions, making them incredibly easy to serve and enjoy. Each guest gets their own perfect little pie, minimizing waste and maximizing convenience. This also allows for an elegant presentation where each guest can pick up their dessert with ease.
- Quick and Easy Assembly: The pumpkin filling for these pies is remarkably simple to prepare. In most cases, it takes just about 5 minutes to whisk together the ingredients. Once the crusts are prepped in the muffin tin, it's a matter of pouring and baking. This streamlined process means you can whip up a batch (or two!) without dedicating an entire afternoon to baking.
- Perfect for Any Occasion: While they are an absolute must-have for Thanksgiving, mini pumpkin pies are versatile enough for any fall gathering, potluck, or even a cozy weeknight treat. Their portability also makes them ideal for bake sales or gifting.
Embracing these miniature pies means embracing a more relaxed and enjoyable holiday baking experience. They offer all the beloved flavors of a classic pumpkin pie, but in a format that's both charming and incredibly practical.
Essential Ingredients for Perfect Mini Pumpkin Pies
Creating these delightful mini pumpkin pies requires a handful of simple, readily available ingredients. The beauty of this recipe lies in its straightforwardness, ensuring delicious results every time. Here's a closer look at what you'll need and why each component is crucial:
The Crust: Homemade or Store-Bought
You'll need enough dough for two standard pie crusts. This is an area where you can absolutely save time without sacrificing quality.
- Store-Bought Pie Dough: For ultimate convenience, pre-made pie dough works beautifully. Look for brands that come rolled out, making your job even easier.
- Homemade Pie Crust: If you enjoy the process and flavor of homemade, by all means, use your favorite recipe. Just ensure it's well-chilled before rolling.
The Creamy Pumpkin Filling
This is where the magic happens, and the blend of flavors creates that iconic fall taste. You'll need:
- Canned Pumpkin Puree: This is the star! Crucially, ensure you grab plain pumpkin puree, not pumpkin pie filling. Pumpkin pie filling often has added spices and sweeteners, which would throw off the balance of this recipe. Plain puree gives you control over the spice profile and sweetness.
- Brown Sugar (Light or Dark): Both light and dark brown sugar work wonderfully, adding depth and a hint of molasses flavor. Dark brown sugar will lend a slightly richer, more caramel-like note. When measuring, always pack the sugar tightly into your measuring cup to ensure accurate proportions and a perfectly sweet filling.
- Evaporated Milk: This is another key ingredient that contributes to the pie's luscious texture and rich flavor. Not to be confused with sweetened condensed milk (which is much thicker and sweeter), evaporated milk is unsweetened and has a slightly richer consistency than regular milk. It helps create a wonderfully creamy and flavorful filling without being overly sweet.
- Eggs: An egg acts as a binder, helping the filling set beautifully as it bakes. For optimal mixing and a smooth, homogenous filling, it's best to use a room temperature egg. If you've forgotten to take it out of the fridge, simply place it in a bowl of warm water for 5-10 minutes to bring it up to temperature quickly.
- Aromatic Spices: A classic blend of cinnamon, ginger, nutmeg, and cloves provides that quintessential pumpkin pie aroma and taste. The beauty of baking at home is that you can adjust these to your preference – feel free to add a little more of your favorite spice if you like a bolder flavor. A pinch of salt also helps to balance and enhance all the sweet and spicy notes.
With these ingredients at the ready, you’re just a few steps away from baking a batch of irresistible mini pumpkin pies that will delight everyone at your holiday table.
Step-by-Step Guide to Baking Your Miniature Masterpieces
Baking these mini pumpkin pies is a straightforward process that yields impressive results. Follow these steps, and you'll have a batch of perfect individual pies ready to cool and chill.
1. Prepare Your Pie Crusts
- Roll and Cut: On a lightly floured surface, roll out your pie crusts (whether homemade or store-bought) to an even thickness. Using a 3.5-inch round cookie cutter or the rim of a sturdy drinking glass, cut out circles from the dough. You'll likely get around 9 circles per standard pie crust, totaling about 18 for two crusts.
- Re-roll Scraps: Gather any leftover dough scraps, gently press them together, and re-roll to cut out additional circles. You want to make sure none of that delicious dough goes to waste!
- Line Muffin Pans: Carefully press each dough circle into the cavities of your muffin pans. Ensure the dough is pressed down firmly into the bottom and snugly against the sides of each cavity, creating a neat little cup.
- Chill: Once all cavities are lined, place the muffin pans in the refrigerator. Chilling the crusts prevents them from shrinking too much during baking and helps them hold their shape better.
2. Mix the Irresistible Pumpkin Filling
While your crusts are chilling, it's time to prepare the flavorful filling. This part comes together incredibly quickly!
- Combine Dry Ingredients: In a large mixing bowl, whisk together the brown sugar, cinnamon, ginger, nutmeg, cloves, and a pinch of salt until they are thoroughly combined. This ensures the spices are evenly distributed throughout the filling.
- Add Wet Ingredients: To the dry ingredients, add the canned pumpkin puree, evaporated milk, and the lightly beaten, room-temperature egg.
- Whisk Gently: Lightly whisk the mixture until everything is just combined and smooth. Be careful not to overmix; over-whisking can incorporate too much air, leading to cracks in the filling. A few gentle strokes until no streaks remain is perfect.
3. Fill and Bake Your Mini Pies
With your crusts chilled and filling ready, it's time for the oven!
- Fill Crusts: Remove the muffin pans from the refrigerator. Spoon approximately two tablespoons of the pumpkin pie filling into each prepared pie crust cavity. Fill them almost to the top, as the filling will settle slightly during baking.
- Bake: Place the muffin pans into a preheated oven set to 400°F (200°C). Bake for roughly 16 to 20 minutes. Baking times can vary slightly depending on your oven, so keep an eye on them. The pies are done when the edges of the filling are set and firm, and the center has only a slight jiggle when gently shaken.
- Cool: Once baked, carefully remove the muffin pans from the oven and allow the pies to cool on a wire rack for about 30 minutes. This initial cooling helps them firm up before handling.
- Remove and Chill: After 30 minutes, gently remove each mini pie from its muffin pan cavity – a thin knife or offset spatula can help ease them out. Return them to the wire rack to cool completely at room temperature. Once fully cooled, transfer them to an airtight container and chill them in the refrigerator for at least 3 hours. Chilling overnight is even better, as it allows the flavors to meld and the filling to fully set, resulting in the best possible texture and taste.
By following these steps, you'll successfully create a batch of perfect mini pumpkin pies, ready for their grand debut at your holiday celebration. For more detailed instructions on baking these delightful treats, you can also check out our guide on Bake Easy Mini Pumpkin Pies in a Muffin Pan: Thanksgiving Ready!
Tips for Serving, Storing, and Customizing Your Mini Pies
Once your beautiful batch of mini pumpkin pies has chilled to perfection, it's time to think about how to best enjoy them and ensure their longevity. These little pies are not only easy to make but also incredibly versatile when it comes to serving and storing.
Elegant Serving Suggestions
One of the joys of individual desserts is how effortlessly elegant they look. While delicious on their own, a few simple garnishes can elevate your mini pies from delightful to decadent:
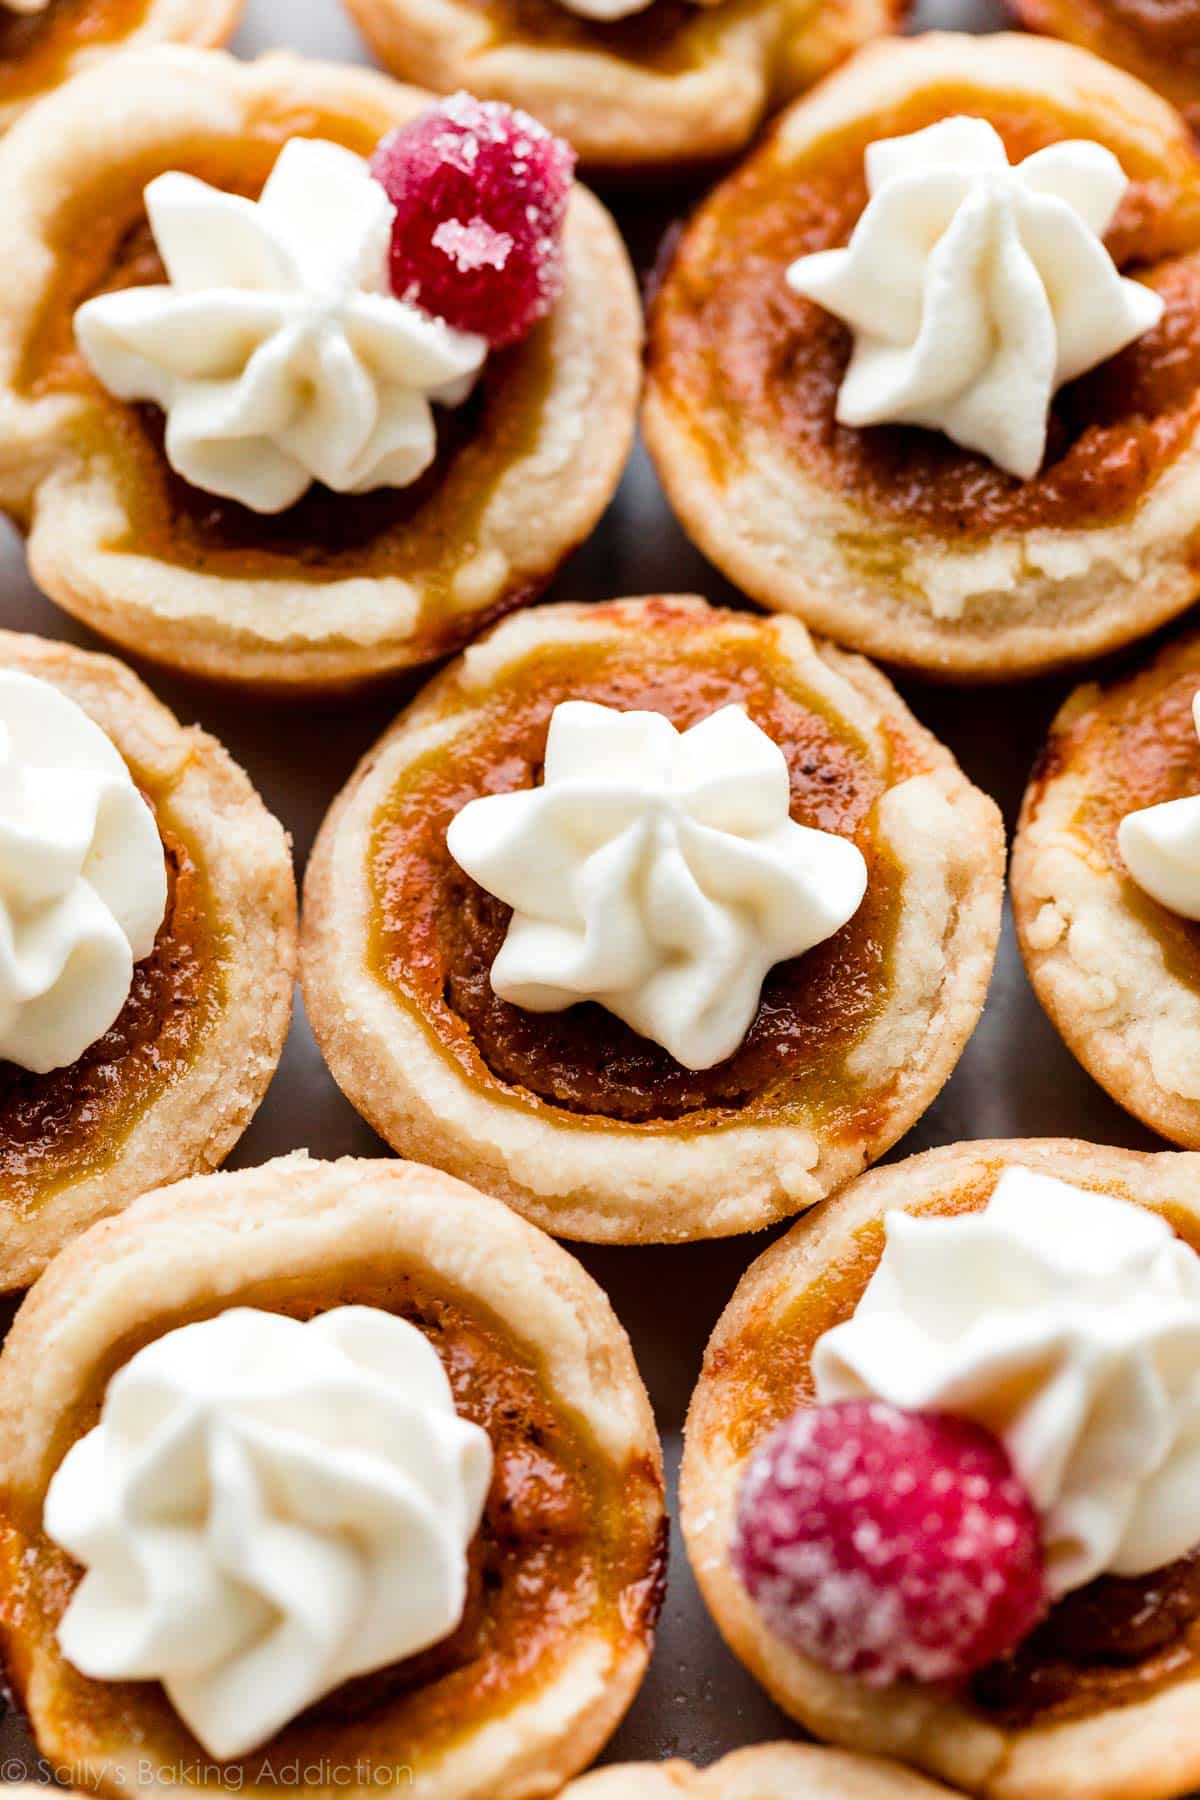
- Classic Whipped Cream: A dollop of fresh, homemade whipped cream is the quintessential topping for any pumpkin pie. You can pipe it on for a professional touch or simply spoon it for a rustic charm.
- Dust of Sweetness: A light dusting of powdered sugar adds a touch of sophistication and extra sweetness.
- Caramel Drizzle: For an extra layer of indulgence, drizzle a bit of warm caramel sauce over each pie before serving.
- Spice it Up: A tiny sprinkle of ground cinnamon or nutmeg over the whipped cream adds visual appeal and a burst of complementary flavor.
- Mini Chocolate Chips: A few mini chocolate chips scattered on top can add a playful texture and a hint of extra sweetness that pairs surprisingly well with pumpkin.
- Decorative Pie Dough Cut-outs: If you have any leftover pie dough, use small cookie cutters (leaves, stars, or tiny pumpkins) to create decorative shapes. Bake these separately until golden brown, then place one on top of each pie for a charming, rustic look.
The individual nature of these pies also makes them perfect for a dessert bar, where guests can easily pick their favorite topping!
Smart Storage and Freezing Options
One of the many advantages of mini pumpkin pies is how well they store, making them excellent for meal prepping or enjoying long after the initial bake.
- Refrigeration: Once fully cooled, mini pumpkin pies should be stored in an airtight container in the refrigerator. They will keep beautifully for 3-4 days, maintaining their fresh taste and texture. Always ensure they are completely cooled before putting them away to prevent condensation.
- Freezing for Later: Yes, you can absolutely freeze these pies! This is fantastic for getting a head start on holiday baking or for saving leftovers.
- How to Freeze: Once the pies have cooled completely, arrange them in a single layer on a baking sheet and freeze for about an hour, or until solid. This "flash freeze" prevents them from sticking together. Then, transfer the frozen pies to a large freezer-safe bag or an airtight container, using pieces of parchment paper between layers to prevent sticking.
- How Long: Frozen mini pumpkin pies can be stored for up to 1-2 months.
- Thawing and Reheating: To enjoy, simply transfer the frozen pies to the refrigerator overnight to thaw. If you prefer them warm, you can gently reheat them in a preheated oven (around 300°F/150°C) for 10-15 minutes, or until warmed through.
Customization for Personal Touch
While the classic recipe is perfect, don't hesitate to experiment and make these mini pumpkin pies your own:
- Spice Variations: Adjust the amount of cinnamon, ginger, nutmeg, and cloves to suit your palate. Some prefer a bolder ginger kick, while others love extra cinnamon. A tiny pinch of allspice or cardamom can also add an intriguing depth.
- Flavor Boost: A splash of vanilla extract or even a tablespoon of bourbon or rum added to the filling can deepen the overall flavor profile.
- Crust Creativity: Beyond simple circles, you can use decorative cookie cutters to create patterns for your crusts or use a fork to crimp the edges of the dough in the muffin tin for a more defined border.
These simple tips and tricks ensure your mini pumpkin pies are not only delicious but also presented beautifully and enjoyed to their fullest potential.
Conclusion
Say goodbye to holiday baking stress and hello to the effortless charm of perfect mini pumpkin pies. These individual delights offer all the warmth, spice, and creamy goodness of a traditional pumpkin pie, but in a format that's easy to make, easy to serve, and utterly stress-free. Whether you're a seasoned baker or a holiday novice, the simple muffin pan method and quick-to-assemble filling make these mini pies an undeniable win for any festive gathering, especially your Thanksgiving table. Embrace the joy of baking again and delight your guests with these adorable, perfectly portioned treats. Your holidays just got a whole lot sweeter, and a whole lot less stressful!
