Why Mini Pumpkin Pies Are the Ultimate Bite-Sized Holiday Dessert
As the leaves turn golden and a crisp chill fills the air, our thoughts inevitably drift to comforting aromas and the joy of holiday gatherings. And what's a holiday table without a pumpkin pie? While the classic, full-sized pumpkin pie holds a special place in our hearts, there’s an undeniable charm and convenience to its miniature counterpart.
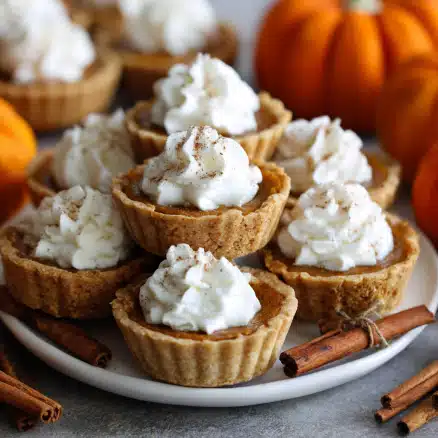
Mini pumpkin pies aren't just adorable; they're a game-changer for holiday entertaining, offering individual portions of creamy, spiced perfection without the traditional pie-making stress. Forget the fuss of perfectly fluted edges or struggling with messy slices; these bite-sized beauties are the ultimate solution for a seamless and delightful dessert experience.
The Unbeatable Charm and Convenience of Mini Pumpkin Pies
Traditional pie making can be an intimidating endeavor for even seasoned bakers. The pressure to create a pristine crust, ensure even baking, and then serve perfect slices often leads to holiday stress. This is where
Perfect Mini Pumpkin Pies: No Pie Decorating Stress for Holidays shine. They eliminate many of these common anxieties, making them a fantastic starting point for pie novices and a brilliant shortcut for experienced bakers.
Instead of wrestling with a large pie plate, these individual treats are baked in standard muffin pans. This simple shift negates the need for elaborate crust decoration, as the muffin tin naturally shapes the crust. Each guest gets their own perfectly portioned pie, which not only looks elegant but also makes serving a breeze. No more uneven slices or crumbling crusts; just delightful, self-contained desserts ready to be enjoyed. Their individual nature also makes them ideal for potlucks, buffet-style spreads, or even as delightful take-home treats for guests.
Simplified Baking: A Beginner-Friendly Holiday Treat
One of the most compelling reasons to embrace
mini pumpkin pies is their incredible ease of preparation. They demystify the pie-making process, breaking it down into manageable, enjoyable steps.
Muffin Pan Magic: Effortless Crusts
The transformation of a large pie into mini versions primarily comes down to the muffin pan. Instead of shaping and crimping a single large crust, you simply use a cookie cutter (around 3.5 inches works best) or even the rim of a drinking glass to cut out smaller circles from your rolled-out pie dough. These circles are then gently pressed into the cavities of a muffin tin, forming instant, perfectly sized crusts. Any scrap dough can be re-rolled and cut, ensuring no waste. This method saves significant time and effort, making the crust portion of the recipe virtually foolproof. You can use your favorite homemade pie crust recipe for a truly artisanal touch, or opt for store-bought refrigerated pie dough for ultimate convenience – both yield excellent results. For more details on this easy method, check out
Bake Easy Mini Pumpkin Pies in a Muffin Pan: Thanksgiving Ready!
Whisk, Pour, Bake: A Quick and Flavorful Filling
The filling for these mini marvels is equally straightforward. In most recipes, the preparation involves merely whisking together the dry ingredients – typically brown sugar, cinnamon, ginger, nutmeg, cloves, and a pinch of salt – before incorporating the wet components: canned pumpkin puree, evaporated milk, and an egg. The entire mixing process for the filling often takes less than five minutes. The key is to mix just until combined, avoiding over-whisking which can introduce too much air and lead to cracks in the final product. This quick assembly means you can spend less time in the kitchen and more time enjoying the holiday spirit.
Essential Ingredients for Flavourful Mini Pumpkin Pies
While the process is simplified, the flavor remains rich and authentic, thanks to a careful selection of ingredients. Each component plays a vital role in achieving that quintessential pumpkin pie taste and texture.
*
Pie Crusts: As mentioned, both homemade and good quality store-bought crusts work beautifully. If making from scratch, ensure your dough is well-chilled for easier handling and a flakier result.
*
Pumpkin Puree: This is the star of the show. It’s absolutely crucial to use plain canned pumpkin puree, *not* pumpkin pie filling. Pumpkin pie filling already contains spices and sugar, and using it will throw off the balance of your recipe.
*
Brown Sugar: Whether you opt for light or dark brown sugar, make sure to pack it tightly when measuring. Brown sugar contributes to the pie's deep, caramelized flavor and moist texture, complementing the pumpkin beautifully.
*
Spices: A classic blend of cinnamon, ginger, nutmeg, and cloves provides that comforting, aromatic warmth we associate with pumpkin pie. Feel free to adjust the quantities to suit your personal preference – a little extra ginger can add a nice kick, or more cinnamon for a traditional feel.
*
Evaporated Milk: This ingredient is often confused with sweetened condensed milk, but they are very different. Evaporated milk is unsweetened condensed milk, meaning water has been removed, making it richer and creamier than regular milk. This richness contributes significantly to the pie's luxurious texture and depth of flavor without being overly sweet.
*
Egg: The egg acts as a crucial binder, holding the filling together and giving it structure. For best results, use a room temperature egg, as it incorporates more smoothly into the mixture, preventing a curdled appearance. If your egg is cold, simply place it in a bowl of warm water for 5-10 minutes to bring it to temperature quickly.
Crafting Your Perfect Bite: A Step-by-Step Guide
Once you have your ingredients ready, assembling these adorable pies is a straightforward process.
Preparing the Crusts with Precision
Start by rolling out your pie dough on a lightly floured surface. Using a 3.5-inch round cutter, stamp out as many circles as possible. Gather any scraps, gently re-roll them, and cut more circles until you have enough for your muffin pan. Carefully press each dough circle into the cavities of your muffin pan, ensuring it’s snug against the bottom and sides. Place the muffin pan with the prepared crusts into the refrigerator while you prepare the filling. Chilling the crusts helps them hold their shape better during baking and contributes to a flakier texture.
Mixing the Silky Filling
In a medium bowl, whisk together the brown sugar, spices (cinnamon, ginger, nutmeg, cloves), and salt until thoroughly combined. Then, add the pumpkin puree, evaporated milk, and the lightly beaten, room temperature egg. Whisk gently until the mixture is just smooth and unified. Avoid overmixing, as this can introduce too much air, leading to cracks in the pies as they cool.
Baking and Cooling for Perfection
Remove the chilled muffin pans from the refrigerator. Spoon approximately two tablespoons of the pumpkin pie filling into each pie crust-lined cavity. Be careful not to overfill, as the filling will puff slightly during baking. Bake your mini pumpkin pies in a preheated oven (typically around 400°F or 200°C) for about 16-20 minutes. Look for the filling to be set around the edges with a slight jiggle in the center, indicating they are done.
Once baked, remove the pans from the oven and let them cool on a wire rack for about 30 minutes. This allows them to firm up slightly before you attempt to remove them. Gently loosen each pie from its cavity and return them to the wire rack to cool completely. The final, and crucial, step is to chill the cooled pies in an airtight container in the refrigerator for at least 3 hours – overnight is even better! This chilling period allows the flavors to meld and the filling to fully set, resulting in that perfectly creamy, sliceable (or rather, "bite-able") texture.
Elevating Your Mini Pies: Presentation and Customization
While delicious on their own,
mini pumpkin pies offer a fantastic canvas for creative presentation. A dollop of freshly whipped cream, perhaps infused with a hint of maple syrup or vanilla, is a classic accompaniment. A light dusting of powdered sugar or a sprinkle of extra cinnamon can add an elegant finish. For a more festive touch, you can use small cookie cutters (think mini leaves or stars) to cut shapes from leftover pie dough, bake them separately, and then perch them atop your finished pies. A drizzle of caramel sauce or a scattering of toasted pecans can also elevate their appeal.
These mini pies are also incredibly practical for making ahead. They can be baked and chilled a day or two in advance, making holiday meal prep much less stressful. They even freeze beautifully: simply place cooled pies in a single layer on a parchment-lined baking sheet until solid, then transfer to a freezer-safe bag or container, separating layers with parchment paper. Thaw in the refrigerator before serving.
In conclusion, the decision to opt for
mini pumpkin pies this holiday season is a choice for simplicity, elegance, and undeniable deliciousness. They provide all the cherished flavors of a traditional pumpkin pie in a convenient, individual serving that’s perfect for any festive gathering. So, embrace the charm of these bite-sized delights and make your holiday dessert table truly unforgettable.